Regularly publishing blog posts and articles is one of the best ways to drive traffic to your website.
However, if you want to get traffic then your posts need to be well optimized.
There are certain steps you can take to increase the chances of people reading your content — such as optimizing it for social media and search engines.
Below are 20 things you should do before and after publishing each and every post on your blog. If you do them, then your articles will get more traffic and your website will grow faster.
They may take some time to do initially, but eventually they will become second nature as you integrate them into your regular workflow.
If you want to download or print the checklist, then you can get it for free here.
But you should also read the article below since it explains all the steps in detail.
Before publishing

Here are 11 things you should do before you hit the “publish” button on every single article or blog post.
1. Add a well-optimized title
The title is the most important part of every article.
It is often your only chance to grab the attention of readers when they are scrolling through the Google search results or the Facebook news feed.
Your title should:
- Include keywords for SEO
- Be interesting to entice people to click
- Accurately describe the content
If you have a title that accurately describes your content but looks super interesting to potential readers, then you are going to get more traffic.
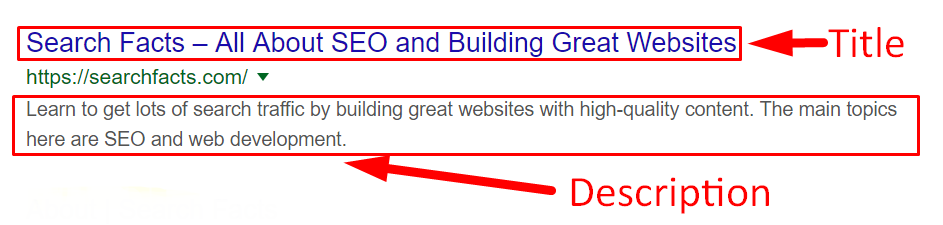
The title is also one of the most important parts of on-page SEO. It is what shows when your article is listed in Google search.
If you are writing an article to get traffic from search engines, then make sure to include keywords in your title tag. Otherwise, the search engines and their users may not fully understand what the article is about.
The title should accurately describe your content, but it also needs to be interesting to get people to click. An interesting title will get you a higher click-through rate on Google, Facebook and anywhere else the article is seen.
Although your titles should be interesting, they have to accurately describe the content. Misleading page titles are not only terrible for your users, but they are also against Google’s search quality rater guidelines.
You may need to install an SEO plugin like the SEO Framework to be able to optimize the title tags for your posts.
2. Write a great meta description
The meta description is meant to be a brief description of what your content is about.
It’s the text that is displayed below your title and URL in the search engine results. However, Google often ignores it and shows other text snippets from your page instead.
But the meta description is also important for social media because it often shows in your post’s snippet when you post the link on Twitter and Facebook.
Same as with the title, the meta description needs to be interesting but accurate. Explain what your article is about and why people should read it.
An SEO plugin may also be required to add a meta description, depending on which theme you are using.
3. Write a clean, descriptive URL
The URL of your blog post is important. It should be clean, short and descriptive.
A lot of people who link to your article may do it by copy-pasting the URL, for example into a forum thread.
If your URL looks interesting but accurately describes your content, then people are more likely to click on it.
Including some form of your keywords in the URL may also have a small SEO benefit.
You can easily change your URL by editing the permalink in the WordPress post editor:
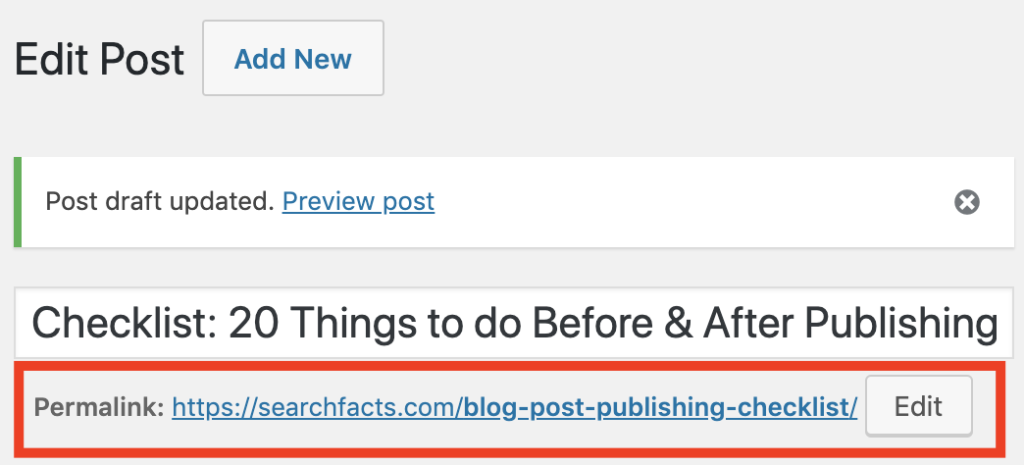
If you are using the new Gutenberg editor in WordPress, then you can change the URL under “Document” -> “Permalink” -> “URL Slug” on the right side of the post editor.
4. Organize your text into chapters
Poorly organized content is bad for user experience.
You should organize your content into logical chapters, in an order that makes sense for your users.
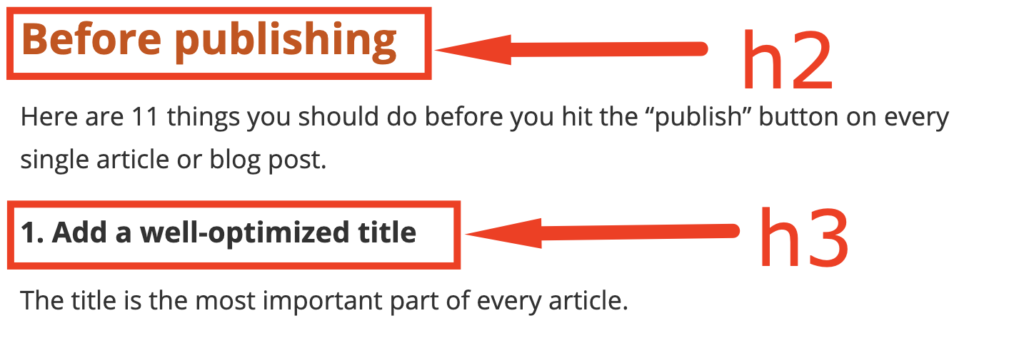
It is recommended to use h2 headings to split your content into chapters. Then you can use h3 and even h4 headings if you need to add subchapters.
See how this current article makes use of h2 and h3 headings to give the article a logical structure.
Having a logical chapter structure is great because it helps both readers and search engine robots understand your content better.
Make sure that the chapter titles are clear and descriptive. Just scanning them should give an idea of what is discussed in each chapter.
5. Make your content readable and scannable
Readability is incredibly important. Without good readability, your content will never reach its full potential.
However, most people don’t read your posts from start to finish — instead, they scan through the content quickly to find the answers that they are looking for.
You need to make sure that both the people who read and scan can find their answers.
Here are some tips to make your text more readable and scannable:
- Use a good, readable web font.
- Make your text black on white. Grey text can be hard to read.
- Have a font size of 16px or higher.
- Use bulleted lists in your articles.
- Keep your paragraphs short. Big blocks of text are bad.
- Make sure your text looks good on mobile.
For more, here are 14 ways to improve readability and scannability.
6. Add a featured image that works well on social media
It is recommended that you add a hand-picked featured image to each and every blog post.
This is the image that shows up when you share the article on social media. It may also show on your home page, related posts section and RSS feed.
Depending on your theme settings, the featured image may also show inside the article, above or below the title.
When deciding on which image to pick, think about what will stand out and make your post look appealing on social media sites like Facebook.

If the photo stands out and grabs attention, then it will help the article get more social traffic, likes, and shares.
If you don’t have your own images, then you can use stock photos. I get most of my stock photos from Shutterstock, but you can also get free ones from Pixabay, Pexels and Unsplash.
7. Optimize images in the article
It can be beneficial to include images in your articles, either for decoration or instruction.
For example, I regularly use screenshots, charts and various diagrams to add value to my articles.
This is great for user experience if done right, but it can also help you drive traffic via Image search.
If your images are properly optimized, then they are likely to rank in Google Images for different search terms.
Here’s how to optimize your images:
- Use descriptive file names.
- Add alt tags to your images.
- If you use captions, make them relevant to the image.
- Make sure the file names and alt tags accurately describe what is on the image.
For example, you could call your image dog-chewing-bone.jpg instead of IMG-0014.jpg. Then the alt tag could say “dog chewing a bone.”
Definitely do not keyword stuff your image file names or alt tags. Use them to accurately describe the images.
Make sure to also have accurate file names and alt tags for your featured image.
8. Add internal and external links
Adding links to your content can sometimes add a lot of value for your readers.
This will help your readers find more info about topics they become interested in as they go through your post.
Adding internal links inside your articles is one of the best ways to increase engagement metrics like pages per session. People who browse around your site are also much more likely to subscribe to your site and become regular readers.
Internal links are great, but it is also worth adding some outbound links to trustworthy sites. Doing this can add value and be helpful for your readers.
An example of when to do this is when you want to link to an explanation of a topic, but you don’t have an article about it on your own site. Then it makes sense to add an external link to an authoritative site.
Don’t worry about outbound links being bad for SEO. This is a myth.
9. Make sure that all the links work
Before you publish an article, you should make sure that all the links in it work.
You can do that by going into Preview mode, scrolling through the article and clicking on all the links. Then make sure that all the links go where they are supposed to.
This shouldn’t take more than a minute, but it can save your visitors from the frustration of clicking on broken links.
As a side note, it also helps to scan your entire site for broken links every few months. My favorite free tool for this is Dead Link Checker.
10. Proofread and scan with Grammarly
Having a lot of spelling and grammar errors in your content is bad.
Even if you don’t notice them yourself, many of your readers will see them. This can make your entire website seem untrustworthy.
Because of this, you should proofread each and every post carefully. Then use a spelling and grammar tool like Grammarly to scan the post for errors.
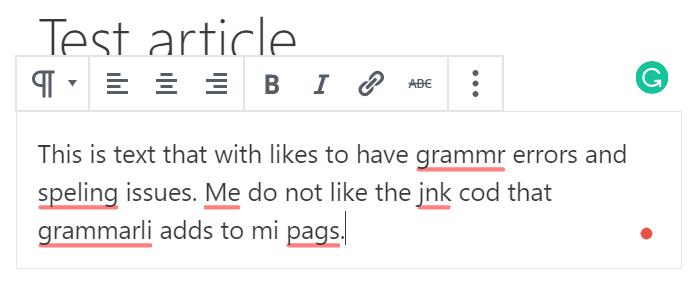
Keep in mind that Grammarly adds some junk code to your posts if you use the Gutenberg editor in WordPress. But it works fine with the Classic editor.
11. Add categories and tags (if applicable)
It can be helpful to organize the articles on your site into different categories.
If you have a lot of content, then it may be useful in some cases to also add tags.
I recommend doing this sparingly because too many categories and tags can be confusing for readers. On this site, I currently have only 5 categories and 0 tags.
It can also be bad for SEO and crawling if Google indexes tons of category and tag pages that only have one or a few articles.
If you have a lot of mostly empty category and tag pages, then it may be beneficial to noindex them. This can be done with most SEO plugins.
After publishing

Your work doesn’t end when you hit the “publish” button on your post.
Now you need to make sure that everything works properly and then take some steps to drive traffic to the post.
Here are 9 things you should do after you publish.
12. Make sure it looks good on mobile
Right after you publish your article, you should open your site on your smartphone and scan through the article quickly.
Make sure that the text is readable and all the elements on your site are properly sized for mobile.
More people browse the web on smartphones than computers these days, so it’s very important that your article looks good and functions well on mobile.
13. Submit to Google Search Console
You don’t need to wait for Google to crawl your site and discover your new article.
If you have a Google Search Console account (a must-have for SEO) then you can ask Google to add your new page to the search index immediately.
To send a request to Google to index your new post, go to the property in Google Search Console for your site.
Then you put your URL into the “Inspect URL” box and then click “Request Indexing.”
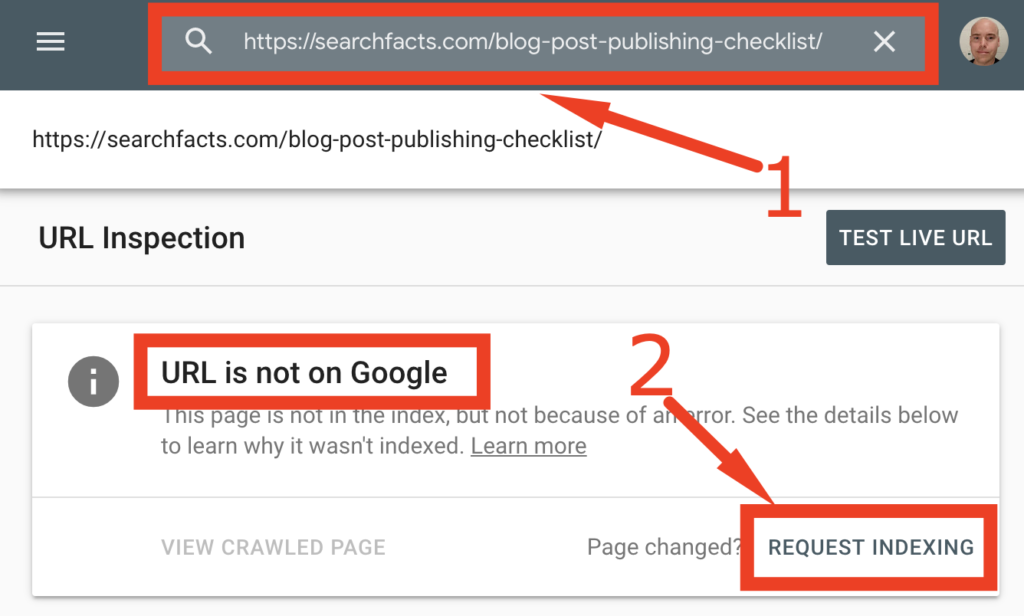
If your post is accessible and has unique, valuable content, then it should get indexed almost immediately. It can take from several seconds to a few minutes.
When I do this, I usually get a big spike in search impressions and clicks for the article on the day it was published.
If you don’t have a Google Search Console account, here are instructions on how to get one. It is also recommended to sign up for Bing and Yahoo.
14. Send an email to your newsletter
You should send an email to your newsletter subscribers to drive traffic to your post.
Instead of sending the entire article via your newsletter, you should simply send a short message with a link to the full article.
This way, people will come to your site to read the article. Some of them may even share the article on social media or link to it from their own sites.
An email newsletter is really the single most effective way to increase repeat visitors to your blog.
If you don’t already have an email newsletter, then you should seriously start building one right away.
There are many email service providers available that make this easy to do. I personally use and recommend Aweber. They are inexpensive but very effective and simple to use.
15. Share it on social media
Next, you should share your article on all the social media platforms you have a presence on.
Some of the most common ones are Facebook, Twitter, Instagram, LinkedIn, and Pinterest.
Don’t just type in the URL of your post and hit enter. Instead, write something original to increase people’s interest in clicking on the article and reading it.
For Twitter and Instagram, you may also want to add some hashtags to the post. This can help you reach more people.
You may also want to share your article again a few days later, just in case some of your followers didn’t see it the first time.
16. Link to it from older articles
It is important to add internal links to related content.
But after you publish a new post, it can also be useful to add links to your new post from your old posts.
This can help boost your new post’s SEO performance since internal links do have some SEO value.
It will also increase traffic to your new article from people who are reading your old posts.
17. Consider asking others to share and/or link to it
Chances are that you know some people who might want to share your content on social media.
You may even be aware of other website owners who might want to link to it.
In that case, it can be a good idea to reach out to them and ask them to share and/or link to your post.
Getting inbound links to your posts is one of the most effective ways to help them rank higher in search engines.
18. Monitor and answer comments
If you have a comments section on your blog, then you should keep track of the comments on your new post.
Try to answer fresh comments as quickly as possible. This shows readers that your blog is active and that you are a real person who is receptive to feedback.
Also, make sure to delete spam and poorly formatted or low-quality comments. These can harm your site’s performance in search and make your site seem less trustworthy.
19. Keep track of Google Analytics
It’s important to keep track of how your article performs over time.
You can check your Google Analytics account occasionally to see how the traffic to the page is evolving.
You can also look at engagement metrics like bounce rate, pages per session and others to see if there is room for improvement.
It can also be useful to keep track of your article in the performance report in Google Search Console. There, you can see which search queries the article ranks for and what your average position is.
Chances are that you will find opportunities to improve your post long after you publish it.
For example, you may find that the post is ranking for some search term that it is poorly optimized for. Then you can add some information about that term to the article and hopefully rank even higher.
20. Review and update the article
It is very useful to update your pages from time to time, especially the ones who are pulling in search traffic.
Google wants to show content that is up to date. Reviewing and updating old content is an effective way to ensure that your posts continue to rank high.
For your top posts, you may even want to review and update them each year.
In fact, many of the world’s biggest websites spend a big portion of their content budget on keeping their previously published content fresh and up to date.
Get the checklist
Here’s a one-page pdf checklist with all the points: Blog post publishing checklist.
You can save it on your computer or print it out. Then go through the list for each and every article that you publish.
This will help you get more traffic and make your website grow faster.