The robots.txt file is a file located on your root domain.
It is a simple text file whose main purpose is to tell web crawlers and robots which files and folders to stay away from.
Search engines robots are programs that visit your site and follow the links on it to learn about your pages. An example is Google’s web crawler, which is called Googlebot.
Bots generally check the robots.txt file before visiting your site. They do this to see if they are allowed to crawl the site and if there are things they should avoid.
The robots.txt should be placed in the top-level directory of your domain, such as example.com/robots.txt.
The best way to edit it is to log in to your web host via a free FTP client like FileZilla, then edit the file with a text editor like Notepad (Windows) or TextEdit (Mac).
If you don’t know how to login to your server via FTP, contact your web hosting company to ask for instructions.
Some plugins, like Yoast SEO, also allow you to edit the robots.txt file from within your WordPress dashboard.
How to disallow all using robots.txt
If you want to instruct all robots to stay away from your site, then this is the code you should put in your robots.txt to disallow all:
User-agent: *
Disallow: /
The “User-agent: *” part means that it applies to all robots. The “Disallow: /” part means that it applies to your entire website.
In effect, this will tell all robots and web crawlers that they are not allowed to access or crawl your site.
Important: Disallowing all robots on a live website can lead to your site being removed from search engines and can result in a loss of traffic and revenue. Only use this if you know what you are doing!
How to allow all
Robots.txt works primarily by exclusion. You exclude the files and folders that you don’t want to be accessed, everything else is considered to be allowed.
If you want bots to be able to crawl your entire site, then you can simply have an empty file or no file at all.
Or you can put this into your robots.txt file to allow all:
User-agent: *
Disallow:
This is interpreted as disallowing nothing, so effectively everything is allowed.
How to disallow specific files and folders
You can use the “Disallow:” command to block individual files and folders.
You simply put a separate line for each file or folder that you want to disallow.
Here’s an example:
User-agent: *
Disallow: /topsy/
Disallow: /crets/
Disallow: /hidden/file.html
In this case, everything is allowed except the two subfolders and the single file.
How to disallow specific bots
If you just want to block one specific bot from crawling, then you do it like this:
User-agent: Bingbot
Disallow: /

User-agent: *
Disallow:
This will block Bing’s search engine bot from crawling your site, but other bots will be allowed to crawl everything.
You can do the same with Googlebot using “User-agent: Googlebot”.
You can also block specific bots from accessing specific files and folders.
A good robots.txt file for WordPress
The following code is what I am using in my robots.txt file. It is a good default setting for WordPress.
User-agent: *
Disallow: /wp-admin/
Allow: /wp-admin/admin-ajax.php

Sitemap: https://searchfacts.com/sitemap.xml
This robots.txt file is telling bots that they can crawl everything except the /wp-admin/ folder. However, they are allowed to crawl one file in the /wp-admin/ folder called admin-ajax.php.
The reason for this setting is that Google Search Console used to report an error if it wasn’t able to crawl the admin-ajax.php file.
Googlebot is the only bot that understands “Allow:” — it is used to allow crawling of a particular file inside a folder that is disallowed.
You can also use the “Sitemap:” line to tell bots where to find your XML sitemap. This sitemap should contain a list of all the pages on your site, so it makes it easier for the web crawlers to find them all.
When to use noindex instead of robots
If you want to block your entire site or specific pages from being shown in search engines like Google, then robots.txt is not the best way to do it.
Search engines can still index files that are blocked by robots, they just won’t show some useful meta data.
Instead, the description in the search results will say “A description for this result is not available because of this site’s robots.txt.”
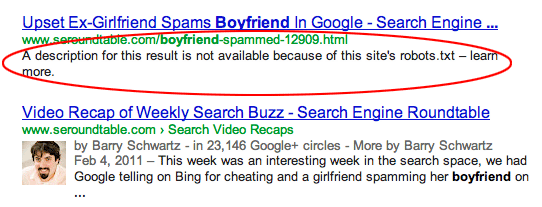
If you hide a file or folder with robots.txt, but then someone links to it, Google is very likely to show it in the search results except without the description.
In these cases, it is better to use the noindex tag to block search engines from displaying it in the search results.
In WordPress, if you go to Settings -> Reading and check “Discourage search engines from indexing this site” then a noindex tag will be added to all your pages.
It looks like this:
<meta name='robots' content='noindex,follow' />You can also use a free SEO plugin like Yoast or The SEO Framework to noindex specific posts, pages or categories on your site.
In most cases, noindex is a better choice to block indexing than robots.txt.
When to block your entire site instead
In some cases, you may want to block your entire site from being accessed, both by bots and people.
Putting a password on your website is the best way to do this. It can be done with a free WordPress plugin called Password Protected.
Important facts about the robots.txt file
Keep in mind that robots can ignore your robots.txt file, especially abusive bots like those run by hackers looking for security vulnerabilities.
Also, if you are trying to hide a folder from your website, then just putting it in the robots.txt file may not be a smart approach.
Anyone can see the robots.txt file if they type it into their browser and may be able to figure out what you are trying to hide that way.
In fact, you can look at some popular sites to see how their robots.txt files are set up. Just try adding /robots.txt to the home page URL of your favorite websites.
If you want to make sure that your robots.txt file is working, you can use Google Search Console to test it. Here are instructions.
Take-Home Message
The robots.txt file tells robots and web crawlers which files and folders they can and can not crawl.
Using it can be useful to block certain areas of your website, or to prevent certain bots from crawling your site.
If you are going to edit your robots.txt file, then be careful because a small mistake can have disastrous consequences.
For example, if you misplace a single forward slash then it can block all robots and literally remove all of your search traffic until it gets fixed.
I have worked with a big site before that once accidentally put a “Disallow: /” into their live robots.txt file. They lost a lot of traffic and revenue from this small mistake.
The robots.txt file is powerful, so treat it with caution.